0. Summary
Whether or not your major project for this module is being undertaken for a real client, I recommend you read this document in its entirety as it also addresses generic topics relating to professional practice not covered elsewhere on this web site.
This document is divided into six sections, this Summary and as follows:
- Parceling land
- Creating an inventory avatar
- Creating a group
- Review and handover
- Some tips when creating content
- Your project report
0.1. Why a real client?
Why should you, when deciding what project to undertake for your major assessment on this course, consider a project for a real client? There are three main reasons:
- it is likely that, in virtue of being a commercial (or at least real-world) project, it will turn out to be a more purposive concept than a project idea you might personally come up with; in any case, it spares you the anxiety of trying to conceptualise a worthwhile project yourself. This is, then, an important consideration: in undertaking a real project for a real client, you are likely to approach your work not as just an academic exercise but as an opportunity to showcase your professionalism and professional skills; and this is likely to be reflected in your final grade (see point 3 below)
- working for a real client gives you authentic experience of professional practice, better preparing you for a career in the industry
- characteristically projects undertaken for real clients will, if satisfying the design brief, completed to an appropriate standard, and rigorously documented, attract a slightly higher grade than personal projects
0.2. What do you hand over to your client?
When building for a client, what do you hand over at the completion of the project?
The simple (but inadequate) answer would seem to be: you hand over what you’ve created or built. This may be all well and good if you are simply creating in-world objects for the client (assuming you have remembered to make all objects full permissions!) and nothing more. The problem with this solution becomes transparent, however, in cases where your task has been to create a permanent presence on (what is or what will be) client-owned land, since crucial components of the work will be associated with the land itself and its management. Your task will be to ensure that the client, in addition to taking possession of the objects in the build, will also acquire full rights over the region or parcel (i.e. subdivision of a region) on which the build is located.
The most straightforward way to accomplish this is to create a new avatar that will be associated specifically with every aspect of the building project; and the handover will then consist of: the land (the region or parcel), the objects, probably a group, and the avatar (whose inventory will contain full perm copies of the entire build). Below is a suggested strategy. (All explanations and examples below presume use of Viewer 2.)
1. Parceling land
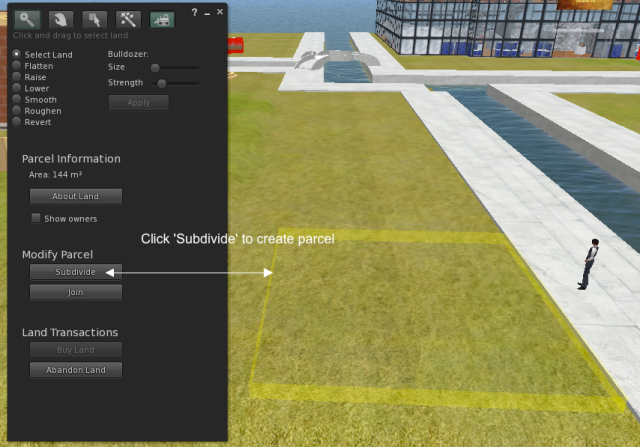
You may be building on land that has already been subdivided into parcels. If not, you may want to create separate parcels (subdivisions of land) for difference purposes, such as restricting the audibility of voice or media to a parcel, or assigning them to different owners or groups. To create a parcel, right-click on the ground and select Edit Terrain; with the Edit Terrain dialogue then open, select the area of the new parcel by left-clicking and dragging the mouse across the terrain; when you have determined the location and size of your new parcel, simply click Subdivide (see illustration):
You can then associate specific properties, such as ownership, abilities (fly, rez, build, run scripts, etc), or media, with your new parcel. [Note a neat trick: if the land that you are parceling lies partly or wholly underwater you’ll find it easy to subdivide the land by temporarily removing the water: from the Advanced menu, select ‘Rendering Types’ and then deselect ‘Water’. Re-select it once the parcel has been created.]
2. Creating an inventory avatar
 The simplest and best way to ensure that your client, on handover, has full ownership and management of the build is to create for each parcel an ‘inventory avatar’ containing the entire content of the build.
On an historical note, in the early days of Second Life, when items might sometimes mysteriously disappear from inventory, it was not uncommon for residents to create a second avatar–an ‘alt’–as an inventory backup. See screenshot, right, for Khoisan’s ‘alt’, and note the last checked box: Artaud can “Edit, delete or take my objects”. Checking this last box is extremely important: you should add the inventory avatar as a ‘friend’, and you must ensure at hand-over that the client inventory avatar is able to edit, delete, or take the objects you have built. Otherwise the inventory avatar has no rights to subsequently modify the build and therefore doesn’t fully own the build!
In the Knowledge Zone, for example, I created an inventory avatar for each of the client areas.
3. Creating a group
Your client may wish to privilege a specific group of residents, to set a timed auto-return for objects introduced (‘rezzed’) by non-group members, to exclude all but a specific group, or possibly even ‘deed’ the land to the group. It’s recommended that you create a SL group specifically for this purpose. In the Knowledge Zone, for example, I created a group for each of the client areas.
There’s one especially good reason for creating a group: if you’re building as part of a team, you’ll want your work for be editable by that team … and that includes team members in the future, long after handover! As a matter of good practice, you’ll in that case want to share all your creative work with the group–see section 5.6 below for further details on setting permissions.
4. Review and handover
On completion of the project you must arrange a project review meeting with your client. You may do this either in a face-to-face real-world meeting or in-world or (the preferred option) both. The advantages of a face-to-face meeting are too obvious to need stating; the advantage of an in-world meeting is that the client will be free to inspect the work at close quarters, and thus able to notice details that may be less apparent in a simple presentation.
You project will be deemed complete only when you have delivered the inventory avatar (i.e., full ownership and control of the build) to your client.
[A note to clients: your building team will have placed awesome power in your hands. If you do not know what you are doing, don’t do it! a build can be destroyed with a misplaced click! Please ask me for training if you believe you need it.]
5. Some tips when creating content
Tutorials on creating specific types of content can be found elsewhere; this is not the place for that. Here I mention only eight very general principles.
5.1. Liaising with your client
The first, and by far the highest priority, is: Liaise routinely and closely with your client! ensure your client is aware of, ideally closely monitoring, and encouraged to give feedback on your work-in-progress throughout the development life-cycle.
5.2. Project management
Liaising closely with your client will be one activity within the more general business of project management. A good project is a well-managed project, with agreed design brief, agreed list of deliverables, time frame and milestones (you might wish, for example, to generate a Gantt chat at the commencement of the project), risk analysis (SL downtime, skills deficit, etc).
5.3. Constraining your build within parcel boundaries
The second is: if building in a defined parcel, keep the build within its boundaries! You can see the boundary of a parcel by right-clicking on the terrain:
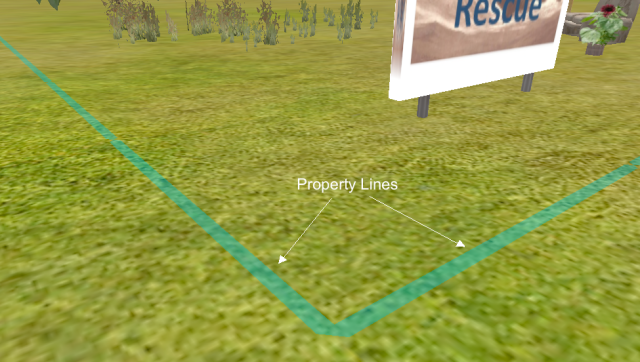
Parcels will be outlined in yellow, their boundary lines (see above image). Alternatively, from the World menu select Show and then check Property Lines:
For so long as Property Lines remains checked, you’ll see the boundary around the parcel:
Additionally you may wish to inspect who owns what land; and in this case also select Show > Land Owners. Land ownership is colour-coded, as below:
- Green: your land
- Aqua: your group’s land
- Red: land owned by others
- Yellow: land for sale
- Purple: for auction
- Grey: public land
Ensure you build within, and never beyond, your parcel.
5.4. Conceptualising content
Generally speaking, the wrong place for the novice builder to start is with his/her own ideas. Whether small scale (furniture, for example) or large scale (buildings, gardens), recognise that design professionals know far more about good design than you ever will.
I strongly recommend, therefore, that you model your creations on real-world designs. You might, for example, bring a reference image into the sandbox in which you are building.
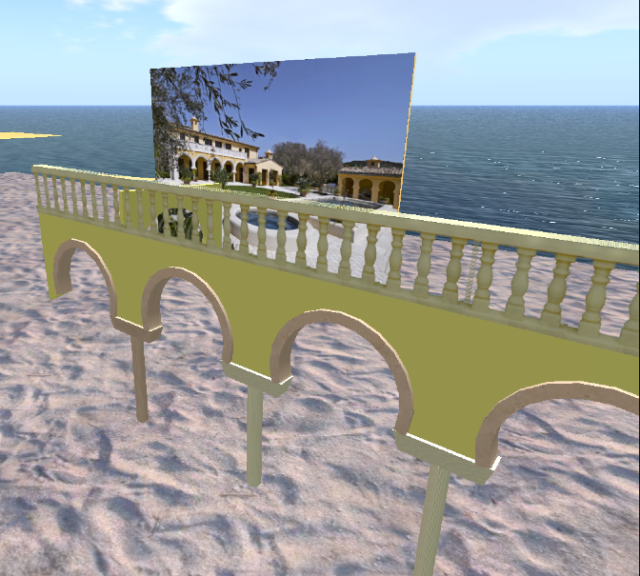
When constructing buildings, a sensible principle is to use (if available) a CAD drawing of the building you are reproducing, either for guidance (as in the model in the figure below) or as an actual floor plan on which you will raise the structure:
5.5. Low-prim, low lag, builds
Each standard sim can support up to 15,000 prims; a parcel of 512m² (16 by 32 metres) will typically have an upper allowance of 117 prims. While this may seem a lot, a large build can very quickly use up that allowance. Consider also that the greater the number of prims, the greater the number of ‘faces’ (a box has six faces, for example) that need to be drawn by the viewer, thus giving extra work to the graphic driver and slowing the rendering of the scene. This is known as ‘lag’.
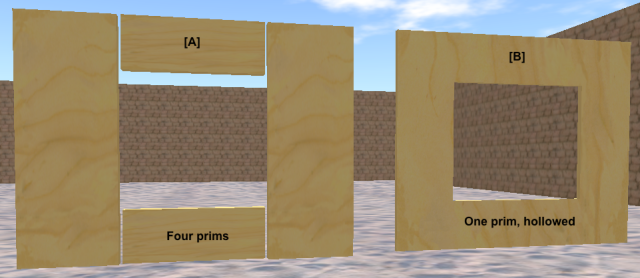
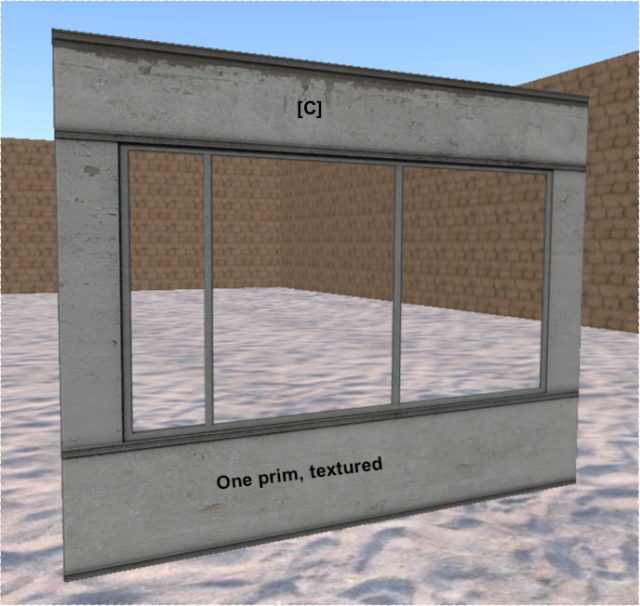
You should consequently endeavour to use as few prims as possible in your object creation. There are many tricks and techniques for accomplishing this; this is not the place to discuss or attempt to list them, though I’ll mention a couple of examples of unnecessarily high-prim structures by way of example and how they might be refashioned:
- windows might commonly be assumed to be spaces bounded by prims (see figure [A] sketch, below); yet the sensible solution is either to hollow a single prim (see [B]) or, if the window is not intended to open, use a windowed wall texture (see [C]):
Similarly, for a doorway, hollow a box prim and the use Path Cut to open the box at one end.
- multi-part real-world objects, such as latticed windows or ornate stonework, might generally be equally well represented by textures
5.6. Setting permissions
 If building for a client you will want to ensure that the client has full rights to copy, modify, or transfer the creative content you have done on their behalf; in other words, to give full ownership of the content to the client. You will therefore make all of your objects ‘full-perm’–under the General tab in the Edit window check the Modify, Copy, and Transfer boxes below ‘Next Owner’.
Simply handing over to the client, however, does not make the client the ‘Next Owner’–Second Life has absolutely no idea what it is you might be doing in the real world unless and until you also make that explicit in the Edit window. The next owner might be the inventory avatar (assuming you’ve not used the inventory avatar for the content creation work), or might be the avatar of the client, or finally might be the group. Probably the smartest way to ensure your content is editable by others after handover, therefore, is to select the “Share with group” checkbox; any other member of the group will then be able to edit your work. But whichever option your go for, you must ensure that you hand over not just your content but also the right to edit that content!
Let me put this another way: when you’ve finished your content creation tasks and you’re handing over the the client, look at the value of ‘Owner’ in the General tab of the Edit window. If the name that appears there is your avatar name, you’ve not yet finished the job!
You might also want to check ‘Move’ and ‘Copy’ below ‘Anyone’; the client can always uncheck them if they wish.
5.7. Protecting your build: locking
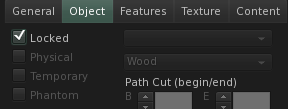 To avoid accidental displacement or deletion of objects by yourself or by other team members, it’s recommended that you lock down your content. Under the Object tab in the Edit window click ‘Locked’.
5.8. Protecting your build: Careful what you rez!
Cautions that apply in the real world apply also in Second Life. You may perhaps have found, or been given in a sandbox, an innocuous enough looking object that might nevertheless, when rezzed on your sim or parcel, cause unanticipated damage to your work–delete your buildings, for example, or re-terraform your land, or rapidly self-replicate until it fills your sim. As a general rule, you should never rez objects you’ve acquired unless you know their provenance, and are full confident that you know exactly what they are or do.
6. Your project report
See, in the right sidebar, The Student View > VR module coursework for further details on the assessment for this module.




You must be logged in to post a comment.